
Advanced FGD Editing Made Easy
(June 7, 2018)
In January 2018, we went over the basics of creating an FGD in the "Anatomy of an FGD (and How to Write Your Own)" guide. For the sake of brevity, we left out many of the choices and features that FGDs offer, such as the ability to define bounding box sizes, models, skins, and defining custom inputs and outputs in Source FGDs. If you haven't read that, we recommend you do so. This guide will not be going over basic syntax or anything of the sort. This guide will instead focus on some of the more common advanced features and syntax found in Valve's default FGDs.
Entity definition parameters (base(), size(), color(), etc.)
Entity definitions can take a variety of parameters that control how the entity looks and interacts in the editor. We already discussed one of them in the original guide, the base() parameter, but there are others.
size()
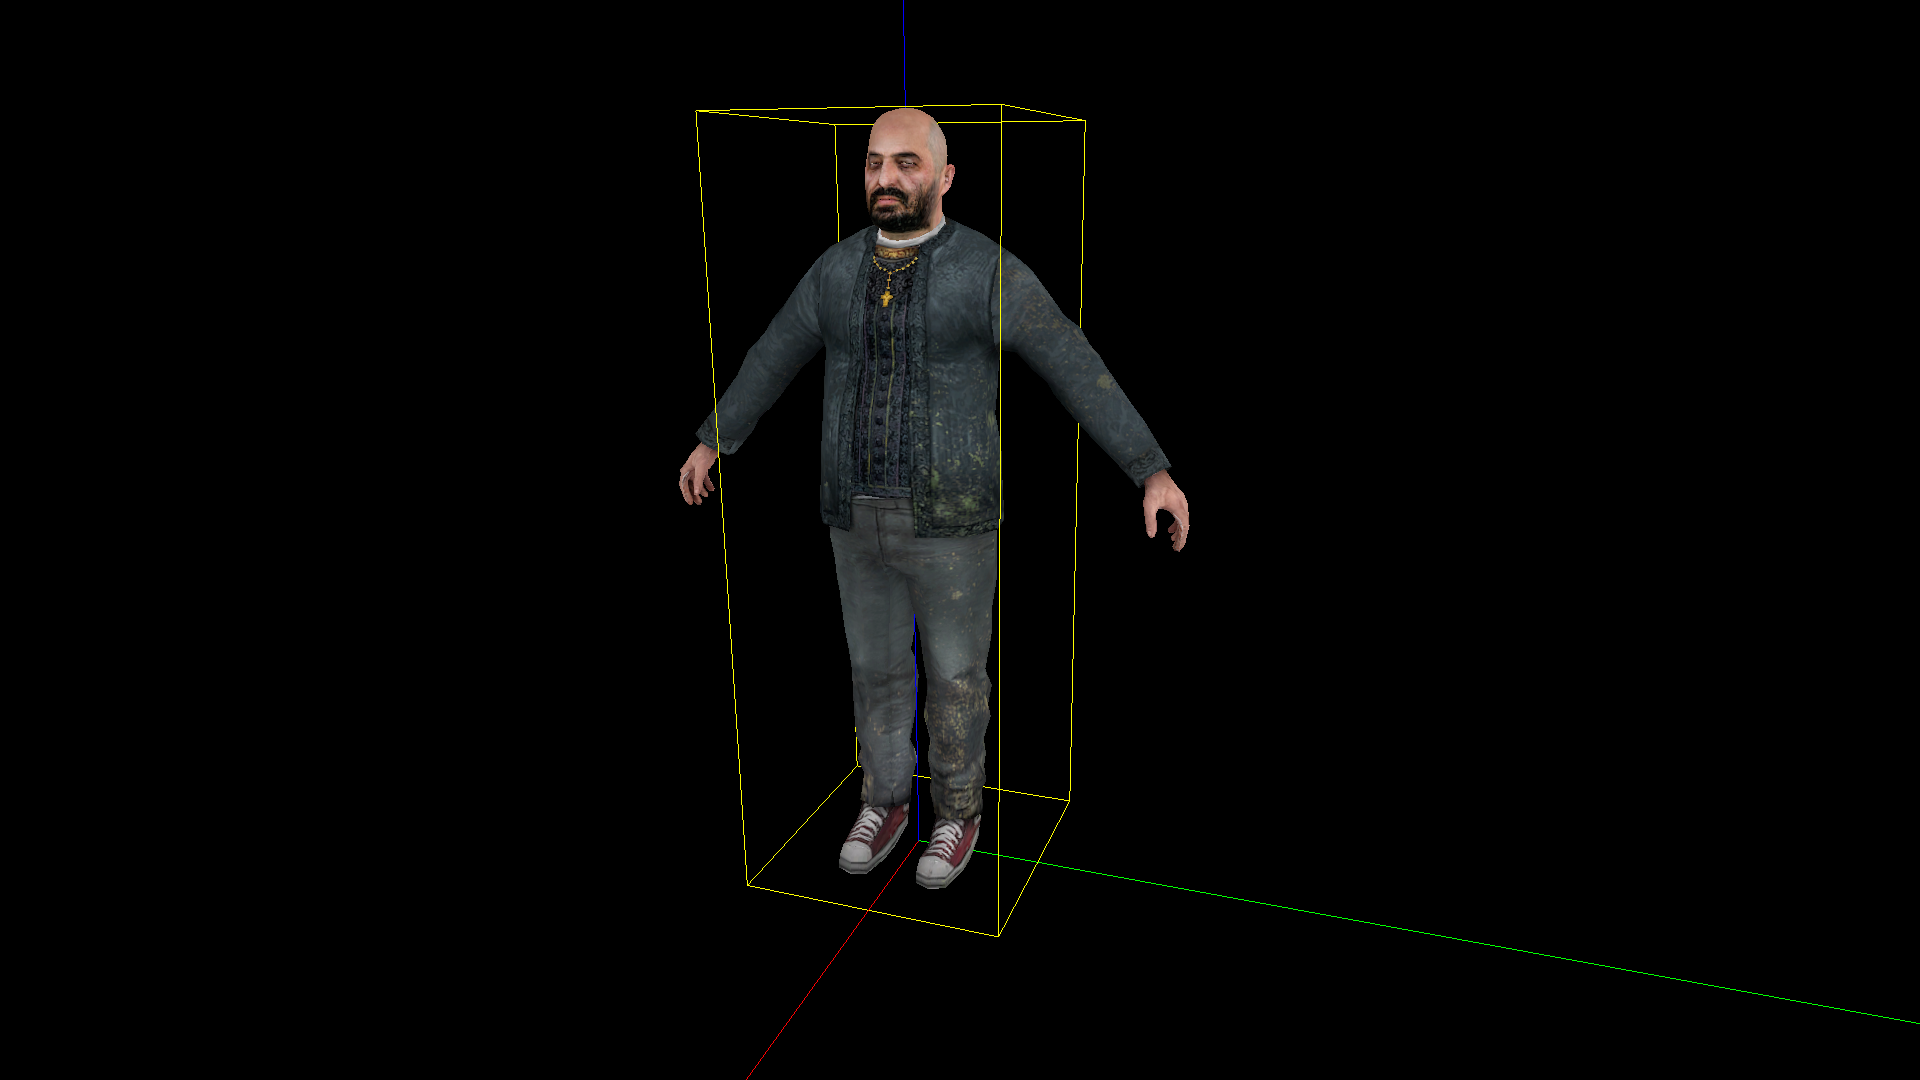
By default, entities in Worldcraft without a model display as a small colored cube. Some entities, such as player starts and items in Quake, rely on proper positioning to show up in-game; therefore, an incorrect bounding box isn't ideal. This is the domain of the size() parameter, which takes six arguments and defines the bounds of the box: -X, -Y, -Z, X, Y, Z. These work from the origin of the entity, dead center.
@baseclass base(Appearflags) flags(Angle) size(-16 -16 -24, 16 16 32) offset(0 0 24) color(0 255 0) = PlayerClass []

@PointClass base(PlayerClass) = info_player_start : "Player 1 start" []
@PointClass base(PlayerClass) = info_player_deathmatch : "Player deathmatch start" []
@PointClass base(PlayerClass) = info_player_coop : "Player cooperative start" []
@PointClass base(PlayerClass) = info_player_start2 : "Player episode return point" []
@PointClass base(PlayerClass, Targetname) = info_teleport_destination : "Teleport destination" []
info_player_start with a custom size next to an info_nullAs seen in the Quake FGD that comes with J.A.C.K., the player is defined as being 32 units wide on the X axis, 32 units wide on the Y axis, and 56 units tall, which is roughly the dimensions of the player in-game. This is why you can use an info_player_start as a measuring tool for scale. The offset() value defines the origin as the bottom of the entity; without this, the info_player_start would spawn in the floor.
color()
The color() parameter takes three arguments, the red, green, and blue of the color, and uses that color instead of the default magenta. If you can't display models in your editor, or if models aren't loaded in correctly, colored entities are an appealing enough fallback.
@PointClass base(Targetname, Angles) size(-16 -16 -16, 16 16 16) color(255 0 0) = env_blood : "Blood Effects"
[
  color(choices) : "Blood Color" : 0=
  [
    0 : "Red (Human)"
    1 : "Yellow (Alien)"
  ]
  amount(string) : "Amount of blood (damage to simulate)" : "100"
  spawnflags(flags) =
  [
    1: "Random Direction" : 0
    2: "Blood Stream" : 0
    4: "On Player" : 0
    8: "Spray decals" : 0
  ]
]
env_blood with a custom color next to an info_nullenv_blood will display as a pure red 32x32x32 box when placed.
iconsprite()
You can have a sprite display for an entity instead of a colored box; this is extremely common in Valve's default FGDs for things such as lights and AI controls. To use a sprite, define it using the iconsprite() parameter.
@PointClass iconsprite("sprites/light.spr") base(Target, Targetname, Light, ZHLT_point) flags(Light) = light : "Invisible lightsource." : "http://twhl.info/wiki.php?id=148"
light with a custom sprite next to an info_nullThe bounding box of the entity will be the same as usual, and the entity will still be invisible in-game. This only affects how the entity displays in the editor.
Defining models and skins in FGDs
All modern editors have the ability to display entity models in place of the traditional brightly-colored bounding box, as defined above. This provides a much more accurate view of model-heavy levels. There's two ways of doing this: the way Worldcraft-like editors support, and the way TrenchBroom supports.
Worldcraft-like editors
Worldcraft's way of dealing with models is the simpler of the two. Use the entity definition parameter studio().
@NPCClass base(TalkNPC) studio("models/Monk.mdl") = npc_monk : "Monk"
studio()The studio() parameter here sets npc_monk (Father Grigori) to use models/monk.mdl. If you need to allow the end user to choose what model to use, such as for prop entities, leave the studio() blank and set the model keyvalue.
@NPCClass base(BaseNPC,Parentname, TalkNPC, PlayerCompanion ) studio() = npc_citizen : "Citizen"
[
	model(choices) : "Model" : "models/humans/group01/male_01.mdl" =
	[
		"models/humans/group01/male_01.mdl" : "Male 1"
		"models/humans/group01/male_02.mdl" : "Male 2"
		"models/humans/group01/male_03.mdl" : "Male 3"
		"models/humans/group01/male_04.mdl" : "Male 4"
		"models/humans/group01/male_05.mdl" : "Male 5"
		"models/humans/group01/male_06.mdl" : "Male 6"
		"models/humans/group01/male_07.mdl" : "Male 7"
		"models/humans/group01/male_08.mdl" : "Male 8"
		"models/humans/group01/male_09.mdl" : "Male 9"
		"models/humans/group01/female_01.mdl" : "Female 1"
		"models/humans/group01/female_02.mdl" : "Female 2"
		"models/humans/group01/female_03.mdl" : "Female 3"
		"models/humans/group01/female_04.mdl" : "Female 4"
		"models/humans/group01/female_06.mdl" : "Female 5"
		"models/humans/group01/female_07.mdl" : "Female 6"
		"models/humans/male_cheaple.mdl" : "Cheaple Male 1"
		"models/odessa.mdl" : "Odessa. DO NOT USE."
	]
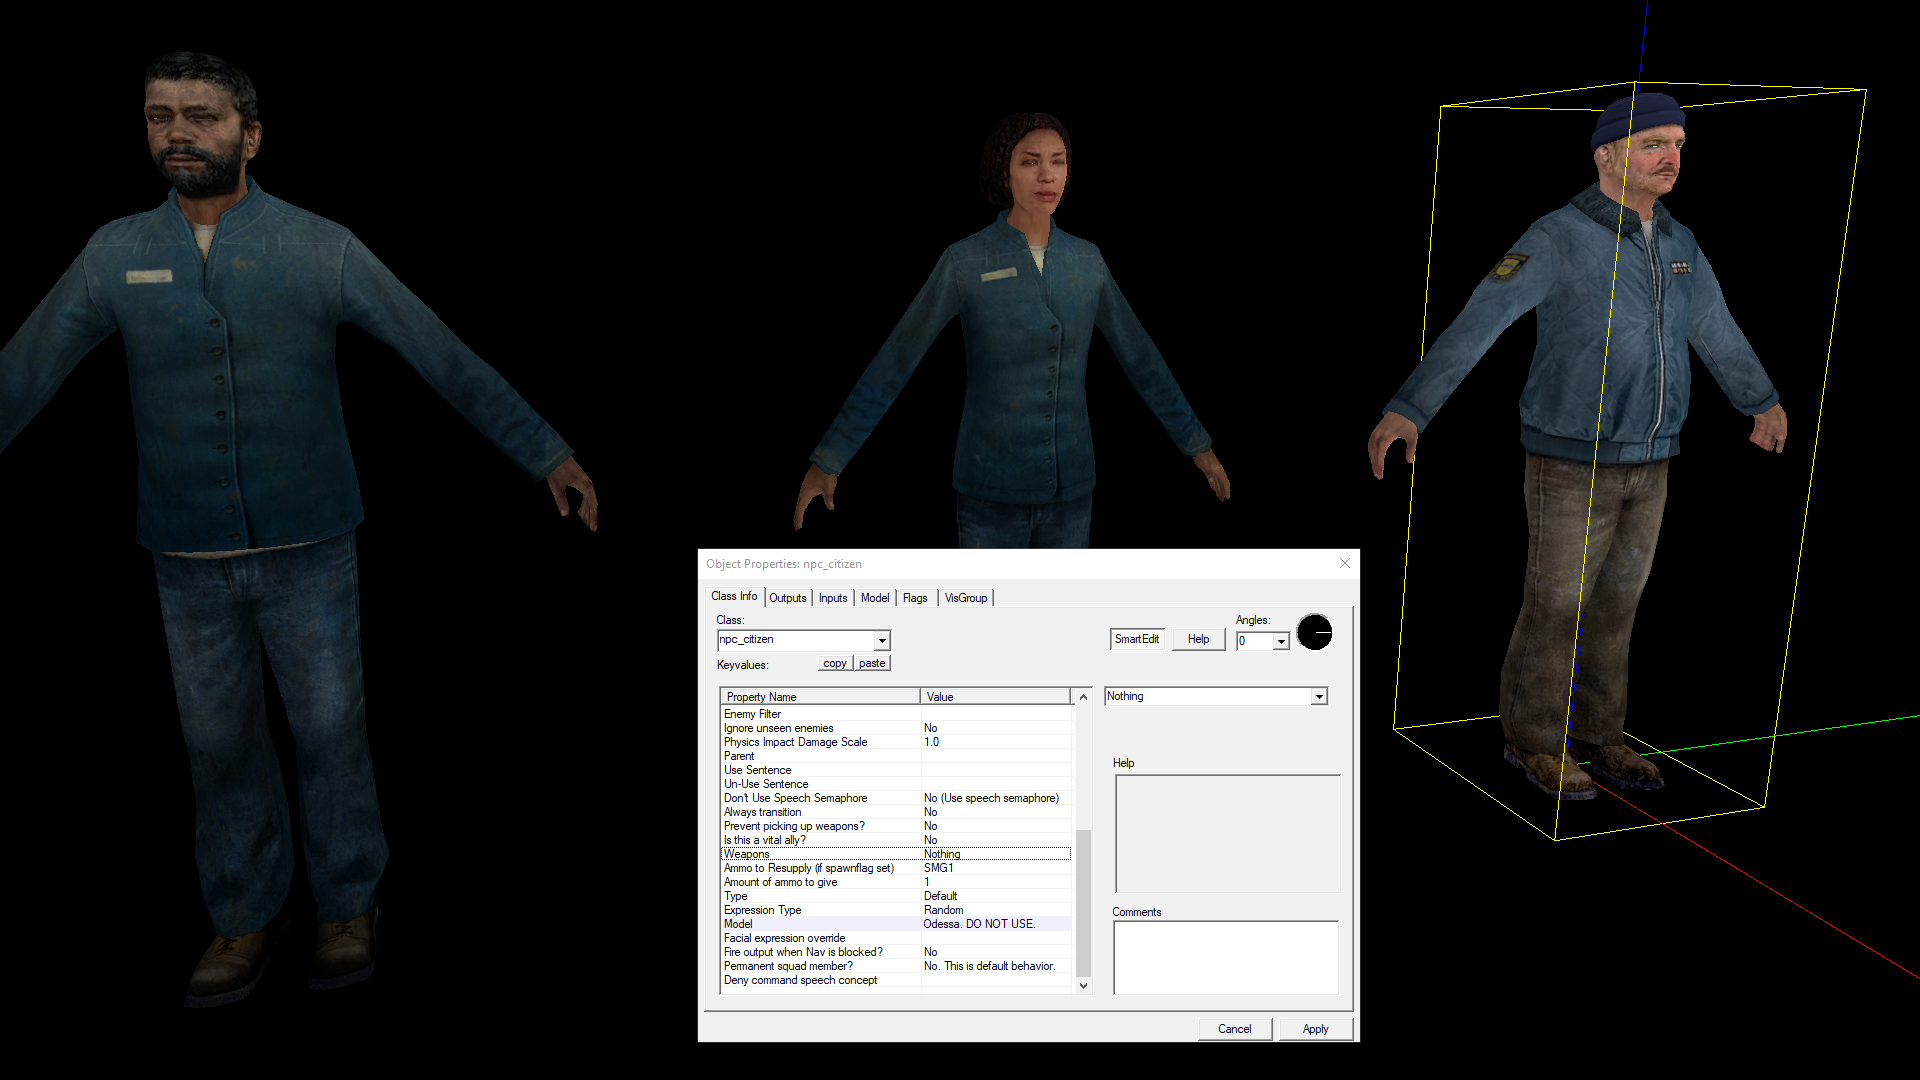
npc_citizen entityBy default, the model keyvalue for npc_citizen is set to use models/humans/group01/male_01.mdl, but can be set to any of the above with a dropdown.
TrenchBroom
Models in TrenchBroom are more complicated. One can use the Worldcraft syntax for this, using the model keyvalue, but TrenchBroom also allows models to display a specific skin and frame, and these require their own syntax.
@PointClass size(-16 -16 0, 16 16 56) base(Item, Appearflags) model({ "path": ":progs/armor.mdl", "skin": 2 }) =
	item_armorInv : "Red armor (200%)" []
The curly brackets take three arguments: the "path" to the model, the "skin" to use, and the "frame" to display. The latter two are optional and will default to 0 if not specified. For the red armor, this uses the third skin in the file.
You can also change the model depending on spawnflag values, using double brackets:
@PointClass
    size(0 0 0, 32 32 56)
    base(Appearflags)
    model(
        {{
            spawnflags & 2 ->   ":maps/b_bh100.bsp",
            spawnflags & 1 ->   ":maps/b_bh10.bsp",
                                ":maps/b_bh25.bsp"
        }}
    ) =
    item_health : "Health pack"
[
	spawnflags(flags) =
	[
		1 : "Rotten" : 0
		2 : "Megahealth" : 0
	]
]
Or, more succinctly (remember that the FGD parser ignores whitespace):
@PointClass size(0 0 0, 32 32 56) base(Appearflags) model({{spawnflags & 2 -> ":maps/b_bh100.bsp", spawnflags & 1 -> ":maps/b_bh10.bsp", ":maps/b_bh25.bsp"}}) = item_health : "Health pack"
[
	spawnflags(flags) =
	[
		1 : "Rotten" : 0
		2 : "Megahealth" : 0
	]
]
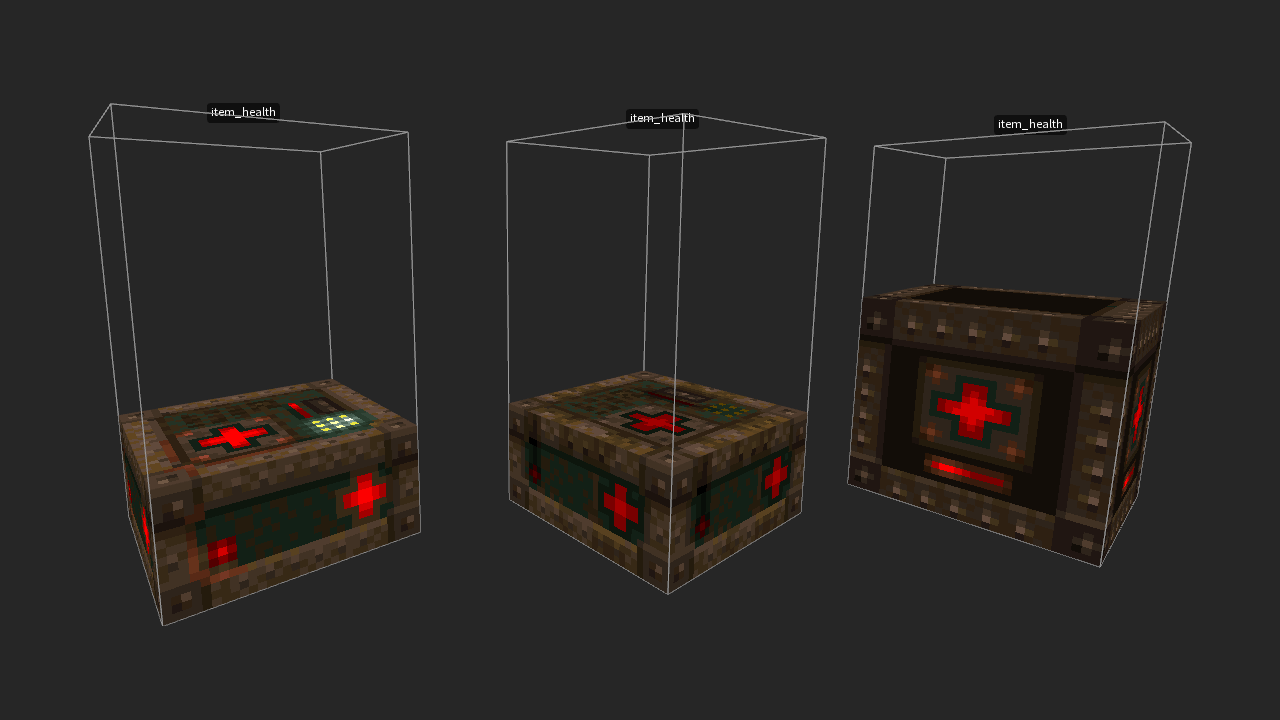
In the case of double brackets, the last model defined is the one that will be used by default. If spawnflags 2 is set, it will use the megahealth model, and if spawnflags 1 is set, the rotten medkit model will be used instead.
Inputs and outputs in FGDs
In another topic we've covered in a guide once before, custom inputs and outputs in Source can be defined using FGDs. (Remember that FGDs are only descriptive and cannot add inputs and outputs, only represent ones existing in the code.) The syntax of an input goes as follows:
input Lock(void) : "Lock the button, preventing it from functioning."
In Valve's FGDs, these often go underneath the keyvalues in the list of property declarations. Again, note the use of the colon (:) as a separator between the input name and the comment. As of now, comments are not displayed within Hammer and can only be seen in a text editor. Outputs are similar:
output OnUseLocked(void) : "Fired when the button is used while locked."
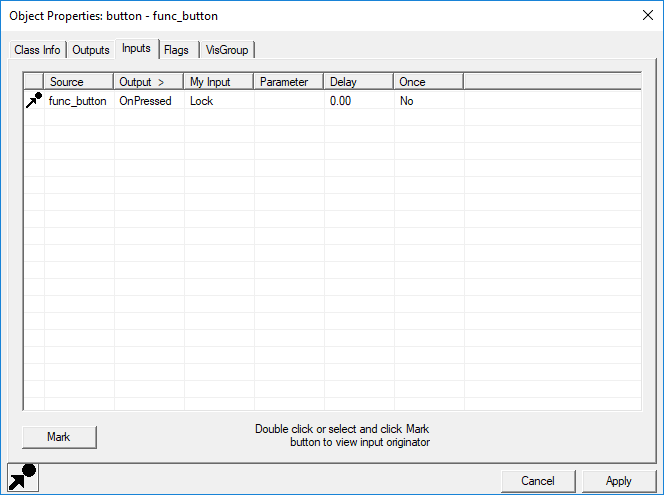

Right: Output, as seen in Hammer
These will be available to use in the Outputs tab of the Entity Properties dialog.
Many more FGD properties, values, and classes exist, but this covers all of the major ones. For further reading, be sure to check out the Valve Developer Community wiki article on the subject.